

- Vicky Hattingh
- May 5
- 3 min read
Hi friends! Today’s card will be the third installment in my 2026 Holiday Card Series where I am attempting to have my holiday cards mostly completed before mid-November. I truly enjoy working with colored pencils – I currently have an excessive 12 full sets of colored pencils at my disposal ranging from inexpensive all the way up to “what was I thinking paying this much for a set of colored pencils!”. Regardless, I have had this Colorado Craft Company stamp set in my collection for many years and I still hadn’t used it. Today that changed… let’s get started!

The supplies used:
Colorado Craft Company – Slimline Poinsettias Stamp Set
The Greetery – Scripted Holiday Sentiments Stamp & Die Set
Spellbinders – Starshine Background Die
Spellbinders – Forest Color Essentials Cardstocks
Anna Griffin – Champagne Matte Foil Cardstock
Prismacolor Colored Pencils – PC921, PC924, PC925, PC942, PC1034
Tsukineko – StazOn Jet Black Ink Pad
Ranger Ink – Wendy Vecchi Watering Can Archival Ink Pad
Woodland Scenics – Yellow Paper Flower Pollen
Iuile Watercolors – Star Watercolor Paint
Altenew – Black ½” Instant Dimension Foam Tape
Bearly Art Precision Craft Glue
Ranger Ink – Tim Holtz Distress Collage Medium Matte
Pinkfresh Studio – Metallic Matte Gold Pearls
My Sweet Petunia – Original MISTI Stamping Tool
Anna Griffin Empress Die Cutting Machine
Creating the Background Panel
For the background panel, I used the paper trimmer to cut a piece of Spellbinders Forest cardstock to measure 3.25” x 8.25” (this will be a slimline card). I also cut a piece of Anna Griffin Champagne Matte Foil cardstock to measure 3.5” x 8.5”. To add texture to the Forest colored panel, I used the Spellbinders Starshine Background die and ran it though the die cutting machine one half at a time since the die was developed for A2 sized cards. A few drops of water were mixed into the Iuile Watercolor “Star” watercolor paint pan and I used the paint to spatter gold across the entire panel. Once the spatter dried, I adhered the Forest cardstock panel to the Champagne Foil cardstock panel.
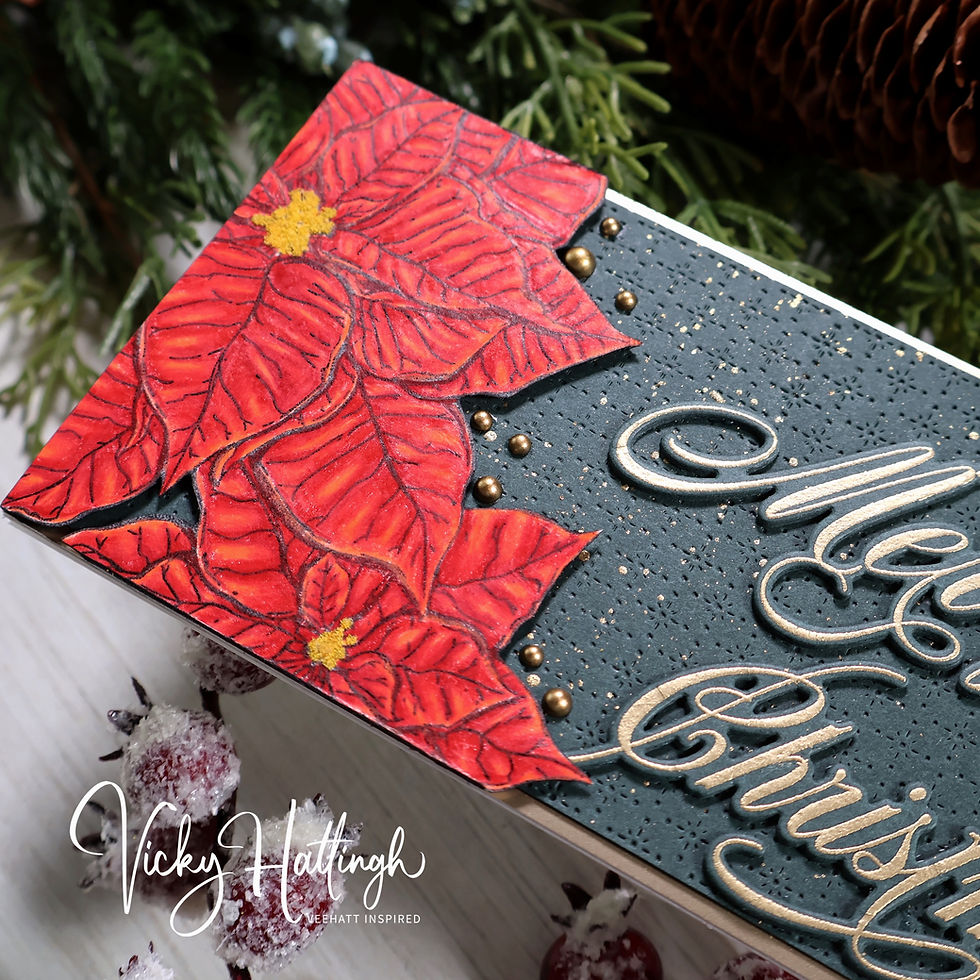
Creating the Focal Point
I stamped the Colorado Craft Company “Slimline Poinsettias” floral images onto a piece of inexpensive white cardstock using Ranger’s Watering Can Archival Ink and the MISTI tool. I left the stamps in the MISTI tool since I will be stamping the image once again after the coloring is completed.
For the poinsettia coloring, I used Prismacolor colored pencils in these colors:
PC924 – Crimson Red
PC925 – Crimson Lake
PC921 – Vermillion Clair
PC942 – Yellow Ochre
PC1034 – Golden Rod
Once the coloring was completed, I placed the paper back into my MISTI tool and stamped the images again using black StazOn ink. I chose StazOn since the colored pencils are wax-based and I figured if the StazOn ink will work on acetate, surely it will work atop wax-based pencil coloring. Next, I applied little dots of Tim Holtz’s Collage Medium Matte on the poinsettia’s cyathia (the yellow centers) and applied a coating of Woodland Scenics’ Yellow Paper Flower Pollen, tapped of the excess, and continued to each poinsettia until all were completed. After the Collage Medium with the pollen coating had a chance to dry, I used scissors to fussy cut both images.
Creating the Sentiment
For the sentiment, I used The Greetery’s Scripted Holiday Sentiments stamp set. I used VersaMark watermark ink to stamp the two sentiments onto a piece of Spellbinders Forest cardstock that had been prepped with anti-static powder. After stamping, I applied Gina K. Designs Fine Detail Gold embossing powder and used my WOW! heat tool to melt the embossing powder. Once cooled, I buffed off the anti-static powder and used The Greetery’s Scripted Holiday Sentiments die set to die cut the sentiments and cut two additional of each from the Forest cardstock to stack the sentiments for dimension.

Assembling the Card
I glued the background cardstock panels to the front of a white, slimline card base. Next, I positioned the poinsettias and sentiments on the background to find a pleasing placement. I adhered the sentiments to the background using liquid glue, then placed pieces of Altenew’s black Instant Dimension Foam Tape to the back sides of both sets of poinsettias and adhered them to the left and right sides of the card front. After trimming off the excess poinsettias that overlapped the edges, I glued a sprinkling of Pinkfresh Matte Gold Pearl embellishments around the edges of the poinsettias to complete this colorful holiday card.
Thank you for stopping by and checking out today’s blog post, I really appreciate it. Until next time, happy crafting!


