top of page
IMG_3565.JPG

Check Out Our Latest Designs

Subscribe and be the first to know about our latest card making designs!

Hi friends!  Today’s card is my take on Jen’s weekly Altenew Challenge Live from 30 June 2026 (Creative Challenge #58).  The challenge is to “create a project that features the magic of the evening sky, i.e., stars, constellations, fireworks, and lightshows, etc.”.  I have a certain Altenew stamp set that I haven’t used in a few years that I want to utilize on this project, but other than that I’m flying blind!  Let’s see how this turns out.


The supplies used:

     Altenew – To The Moon Stamp Set

     Altenew – Whispers in the Canopy Stamp Set

     Altenew – Masking Paper

     Altenew – Obsidian Pigment Ink Pad

     Simon Says Stamp – Pawsitively Saturated Ink Pads:  Flax, Wheat, Fawn

     Ranger Ink/Tim Holtz – Distress Ink Pads:  Crushed Olive, Evergreen

          Bough, Broken China, Faded Jeans, Uncharted Mariner, Black Soot

     Spellbinders – Raven Cardstock

     Waffle Flower – Background Blender Brushes

     Ranger Ink – Glossy Accents

     Altenew – 1” x 1/16” Black Instant Dimension Foam Tape

     Bearly Art Precision Craft Glue


Creating the Background

For the background panel, I started out with a white piece of cardstock that measured 5” x 7” (it will be trimmed later to measure 4.5” x 6.25”).  I placed it in my Altenew Stampwheel 2.0 and placed the solid circle stamp from the Altenew To The Moon stamp set on the upper left corner of my cardstock to start stamping the three layers for the moon.  The inks I used were Simon Says Stamp’s Flax for the first moon layer, Wheat for the second layer, and Fawn for the third layer.  I stamped the solid circle stamp a second time onto a piece of Altenew’s Masking Paper since I will mask off the moon before I ink blend the night sky.  I fussy cut the circle image from the masking paper, removed the backing paper from the mask, and applied it over the moon stamped onto the white cardstock.


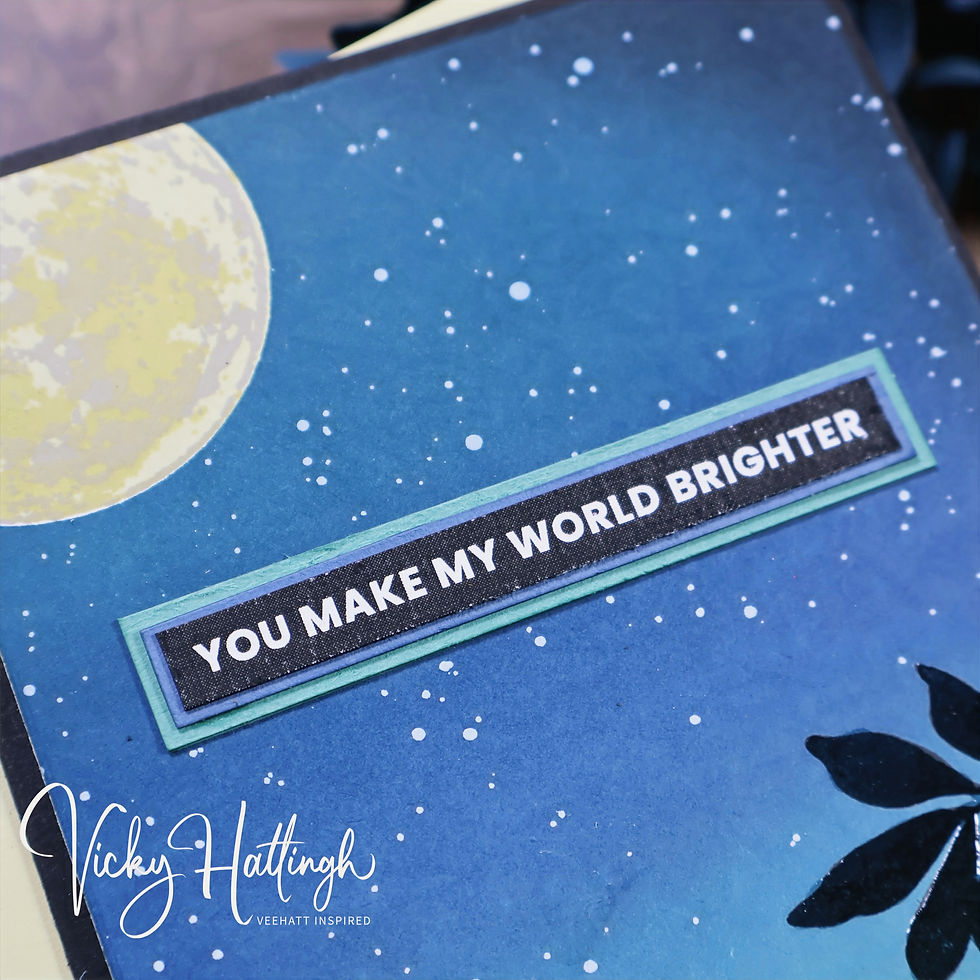
Next, I selected the ink pad colors I will use for my night sky.  I decided to go with a rather unusual blend (for me anyway) and decided to use the Ranger/Tim Holtz Distress Ink Pads for the ink blending and the colors were:  Crushed Olive, Evergreen Bough, Broken China, Faded Jeans, Uncharted Mariner, and Black Soot.  I used the Waffle Flower Background Blender brushes for my background ink blending and started with Crushed Olive to work my way up from the bottom left corner of the cardstock until I reached my final color of Black Soot.  For my silhouette image at the bottom of the card, I chose to use the Altenew Whispers in the Canopy stamp set and stamped the large foliage stamp so that it draped over the bottom, right corner of my card front using Altenew Obsidian pigment ink.  I mixed a few drops of water with a dab of the Altenew Titanium White Artists’ gouache and spattered it across the background panel with a small paint brush making sure to try and not get too much of it on the silhouette.  After the gouache dried, I carefully removed the mask from the moon.  Lastly, I applied a thin coat of Ranger’s Glossy Accents to the silhouette leaves to add some depth to what is essentially all but a one-layer card.


Creating the Sentiment

For the sentiment, I chose to use one the Altenew Printable Sentiment Strips that says, “You Make My World Brighter”.  I swiped the Distress Ink Faded Jeans ink pad across a scrap piece of white cardstock and did the same with the Evergreen Bough ink pad on another scrap of white cardstock.  I added liquid glue to the back side of the sentiment strip and adhered it to the Faded Jeans cardstock and trimmed around the sentiment to give it a thin mat, then stacked the sentiment on top of the Evergreen Bough cardstock and trimmed around it to create a thin mat.


Assembling the Card

I cut a piece of Spellbinders Raven cardstock to measure 9” x 6.25” and scored it down to middle on the long side at 4.5” – this created my A6, side folding card base.  I trimmed the inky background to measure 4” x 6” and added strips of Altenew Black Instant Dimension Foam Tape in the 1” size to the back side of the background panel.  After removed the adhesive backing, I adhered the background to the center of the card base.  With that… this card is completed!


Thank you for stopping by and checking out today’s blog post, I really appreciate it.  Until next time, happy crafting!


Hi friends!  Today’s card is my take on Jen’s weekly Altenew Challenge Live for 16 June 2026 (Creative Challenge #56).  The challenge is to “create a project that embraces repetition as a design element”.  I have the products in mind that I want to use for this challenge, now let me see if I can pull it off successfully!


The supplies used:

     Altenew – Bubbly Bumble Bee Layering Die Set

     Altenew – Making Moments Press Plate

     Altenew – One-Go: Solid Sentiment Banners Press Plate & Die

     Spellbinders – Precision Layering A2 A Die Set

     Spellbinders – Merlot Colorwheel Cardstock

     Gina K. Designs –Black Onyx Cardstock

     My Favorite Things – Butterscotch Cardstock

     Tsukineko – VersaFine Clair Nocturne Ink Pad

     Tonic Studios – Vintage White Vellum Paper

     Altenew – Ultra Stick Double Sided Tape, 1”

     Altenew – ¼” x 1/16” Black Instant Dimension Foam Tape

     Bearly Art Precision Craft Glue

     Spellbinders – BetterPress System

     Anna Griffin Empress Die Cutting Machine


Creating the Background Panel

For the background panel, I used the largest die from the Spellbinders Precision Layering A2 A die set to die cut a piece of Gina K. Designs Black Onyx cardstock and the second largest die to die cut a piece of Spellbinders’ Merlot cardstock.  This gave me a black matting layer with a dark red background for the bees I'll be using for my repetition element.  Using the Altenew Making Moments Press Plate and my Spellbinders BetterPress system, I added VersaFine Clair Nocturne ink to the press plate and applied the impression to the Merlot cardstock panel.


Creating the Decorative Elements

For the bumble bees, I used Altenew’s “Bubbly Bumble Bee” layering die set.  I die cut the layers for the bee from Gina K. Designs Black Onyx cardstock, Tonic Studios’ Vintage White Vellum Paper, and My Favorite Things’ Butterscotch cardstock.  Once the die cutting was completed, I used Bearly Art glue to adhere the layers together (the design required 11 completed bees).  After the glue dried, I positioned the bees onto the A2 size card front and tried to mix up their positioning, so all the bees weren’t facing the same direction or in the identical orientation.  Once happy with their layout, I adhered them to the Merlot cardstock panel with liquid glue.


Creating the Sentiment

For the sentiment, I chose the “Wishing You a Great Day!” sentiment banner from Altenew’s One-Go: Solid Sentiment Banners Press Plate set.  I used the Spellbinders BetterPress system and the VersaFine Clair Nocturne ink pad and pressed the sentiment banner onto a piece of white cardstock.  After allowing the ink to dry approximately 30 seconds, I used the coordinating Altenew die to die cut all the sentiment banners.


Assembling the Card

To assemble the card, I added strips of Altenew’s 1” Ultra Sticky Double-Sided Tape to the back side of the card front with the bees on it and adhered the panel to the black matting layer.  I also added the double-sided tape to the back side of the matting layer and adhered it to an A2, side folding, Butterscotch colored card base.  Next, I added pieces of Altenew’s 1/4” wide, black Instant Dimension Foam Tape to the back side of the sentiment banner that required support and adhered it to the card front.


Thank you for stopping by and checking out today’s blog post, I really appreciate it.  Until next time, happy crafting!


Hello and thank you for joining me for another Altenew Inspiration Challenge!


Fall is not quite here yet, but I can feel the nip in the air before work each morning as the temperatures have dropped considerably. I cannot wait for the splash of color to begin as mother nature transitions our landscape into its annual autumn beauty.


For this month’s Challenge, I wanted to use colors from the Altenew Metallic Watercolor 14 Pan Set that best match the colors in the challenge. To create this month’s card, I began with a piece of Legion Stonehenge Black Aqua Coldpress watercolor cardstock. I stamped the mandala image from the Altenew Blooming Mandalas Stamp and Die Bundle using Altenew Clear Embossing Ink then coated it with clear embossing powder and heat set it with my embossing tool.


The next step was to watercolor the image with the Altenew Metallic Watercolor 14 Pan Set – the colors I chose to use were Prasiolite, Rose Quartz, and Rhodolite to paint the image. Once the painted mandala dried, I used the associated die and my die cutting machine to neatly cut the image from the watercolor paper.


To add some texture and dimension to this card, I used another piece of the black cardstock, misted it with water, and utilized the Altenew Enchanting Vines 3D embossing folder to emboss the beautiful botanicals onto the cardstock. I followed that by adding silvery splatter all over the card front panel.


Using the Altenew Sweet Sentiments Hot Foil Plate and Die Set, I selected the Hugs sentiment and hot foiled it with a shade of pink hot foil onto a scrap of the black cardstock and cut it out with the coordinating die.


I applied double-sided foam tape to adhere the mandala and Hugs sentiment to the card front panel. Then to wrap up the card I chose some color appropriate gems from my stash and glued them to strategic places on the mandala and scattered about across the rest of the card front.


I was quite happy with the way my spin on the color selection for this month’s Altenew Inspiration Challenge turned out and I hope you enjoyed it as well. I cannot wait to see your project inspired by this month’s challenge image. You can start by clicking on the link below!


Thank you so much for stopping by to see me – I appreciate you doing so!


Until next time…


Life is full of inspiration and experiences

Follow us on Instagram

  • Instagram
Subscribe to our Mailing List

Thanks for submitting!

  • Instagram

© 2025 by VeeHatt Inspired. Privacy Policy. All Rights Reserved.

bottom of page