top of page
IMG_3565.JPG

Check Out Our Latest Designs

Subscribe and be the first to know about our latest card making designs!

Hi crafty friends!  Today I am sharing a colorful Thanksgiving card that I made using the Thankful Silhouettes stamps from Stampers Anonymous and Tim Holtz, as well as a stamp/stencil set from The Greetery.  The large wordy stamp in Thankful Silhouettes is everything a crafter needs for a great Thanksgiving background created. 


The supplies used:

Stampers Anonymous/Tim Holtz – Thankful Silhouettes Stamp Set

     Spellbinders – Windy Fall Leaves Press Plates and Die Set

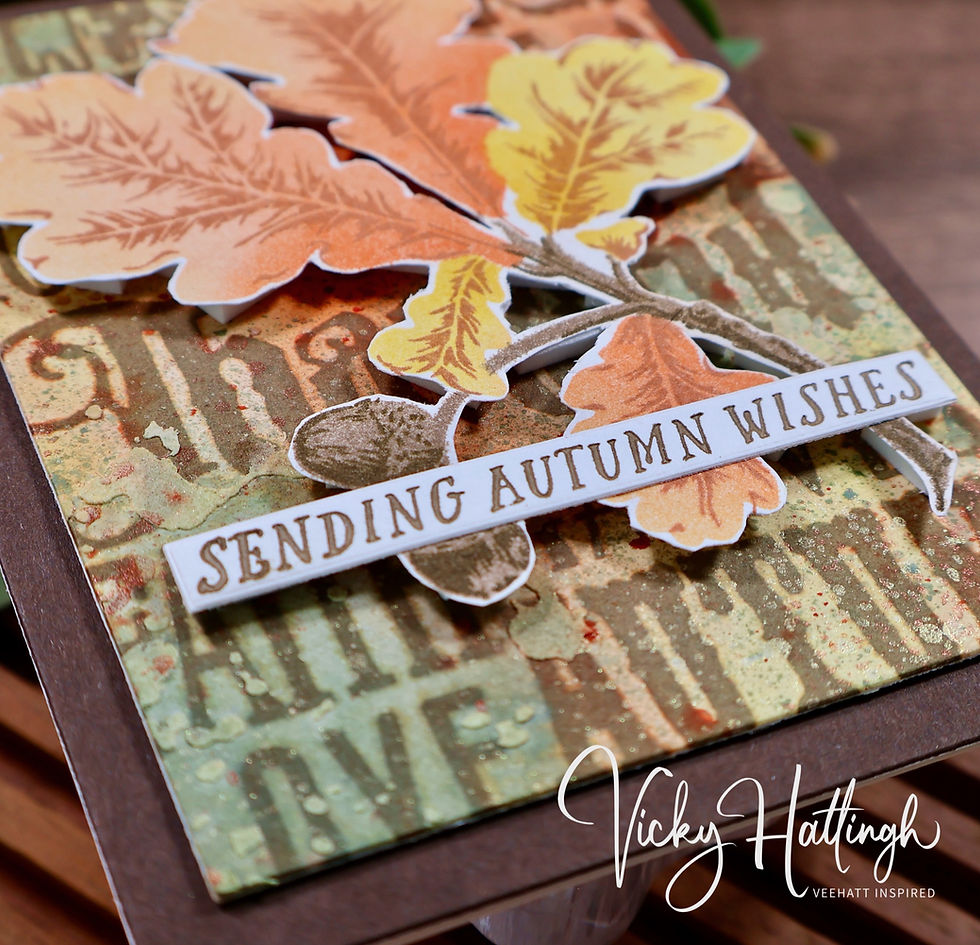
     The Greetery – Oakwood Stamp and Stencil Set

     Spellbinders – Precision Layering A2 A Die Set

     Scrapbook.com – Heavy Weight Mixed Media Paper Pad (White)

     Spellbinders – Timber Color Essentials Cardstock

     Ranger/Tim Holtz – Distress Archival Ink, Ground Espresso

     Simon Says Stamp Pawsitively Saturated Ink – Clay, Nutmeg,

          Cocoa, Cappuccino, Cantaloupe, Sherbet, Honey

     Ranger/Tim Holtz – Distress Spray Stain – Crackling Campfire,

          Vintage Photo, Squeezed Lemonade, Bundled Sage

     Ranger/Tim Holtz – Distress Spritz – Crackling Campfire, Squeezed Lemonade

     Stampers Anonymous/Tim Holtz – Grime “THS130” Layering Stencil

     Ranger/Tim Holtz – Distress Opaque Texture Paste

     Ranger/Tim Holtz – Distress Palette Knife

     Simon Says Stamp – Big Momma Foam Tape

     Ranger Heat It Craft Tool

     Anna Griffin Empress Die Cutting Machine

     Spellbinders BetterPress Letterpress System


Creating the Card Front Background

I cut a piece of white, Heavy Weight Mixed Media Paper from Scrapbook.com to measure 5-1/2” x 6” and used blue painter’s tape to adhere it to a hardboard.  Since I will be using Distress Spray Stain on the panel, I placed the large wordy stamp from Stampers Anonymous/Tim Holtz called “Thankful Silhouettes” onto an acrylic block and stamped the image using Ranger/Distress Ground Espresso Archival Ink. 


Once the stamping was completed, I used the Stampers Anonymous/Tim Holtz “Grime/THS130” stencil and Ranger/Tim Holtz Distress Opaque Texture Paste and partially pasted portions of the background panel in three locations on each background to add interest.  I cleaned up my stencil and palette knife and set the two backgrounds aside to allow the paste to fully dry.


Once the texture paste was dry, I began spritzing Ranger Distress Spray Stains in the colors Crackling Campfire, Bundled Sage, Squeezed Lemonade, and Vintage Photo.  I alternated between these four colors and small amounts of water until I got the look I was trying to achieve.  I dried the panel with my Ranger Heat It Craft Tool and, once relatively dry, I sprayed a bit of Distress Spritz in the Crackling Campfire and Squeezed Lemonade colors to give the background a bit of shimmer.  When everything was completely dry, I removed the inky panel from the hardboard and die cut it using the third largest die from the Spellbinders Precision Layering A2 A die set.  I also die cut a piece of Spellbinders Timber cardstock using the largest die from the Precision Layering A2 A die set for a matting layer.  I adhered the Timber cardstock to the front of a white A2 size card base and added Simon Says Stamp Big Momma Foam Tape to the inky panel and adhered it onto brown the matting layer.


Creating the Focal Point

For the focal point, I used The Greetery’s “Oakwood” stamp and stencil set.  I started by taking a piece of 4-1/2” x 5-1/2” white cardstock and placed it on my Simon Says Stamp “Stamp and Stencil Mat” and placed the first stencil from the Oakwood set over the cardstock and ink blended Simon Says Stamp Cappuccino ink over the acorns and a combination of Simon Says Stamp Cantaloupe and Sherbet inks over the two leaves.  For stencil 2, I ink blended the top three leaf openings with Simon Says Stamp Honey ink and the same Cantaloupe/Sherbet combination for the bottom leaf opening.  For stencil 3, I ink blended the branch openings with the Cappuccino ink.


Next, I placed the ink blended panel into my MISTI stamp positioner and began placing the stamps from the Oakwood stamp set over the ink blended images they coordinated with.  These are the Simon Says Stamp ink colors I used for each stamp:

     A – Clay

     B – Nutmeg (yellow leaves) and Clay (orange leaf)

     C & D – Cocoa


I removed the stamped cardstock panel from the MISTI and fussy cut it out since I didn’t have the coordinating die. 


Building the Sentiment

Utilizing the Spellbinders “Windy Fall Leaves” Press Plates and Die set, I used Simon Says Stamp Cocoa ink and the ‘Sending Autumn Wishes’ sentiment from that set and together with my Spellbinders BetterPress system created the sentiment and die cut it with the die from that same set.  I placed additional scraps of cardstock on the back of the sentiment to give it some additional strength and dimension.   


Finishing the Design

To complete the card, I added foam squares to the back side of the leafy focal point and adhered it and the sentiment onto the mixed media, card front background.  Lastly, I adhered the card front to an A2 size card base and that wrapped up today’s card.


Thank you for stopping by and checking out today’s blog post, I really appreciate it.  Until next time, happy crafting!


Hi crafty friends!  Today I am sharing a colorful Thanksgiving card that I made using the inky background technique and Thankful Silhouettes stamps from Stampers Anonymous and Tim Holtz, as well as a pumpkin stamp set released in 2024 from Spellbinders.  The large wordy stamp in Thankful Silhouettes is everything a crafter needs for a great Thanksgiving background created – especially since I made two cards utilizing the same background technique this week. 


The supplies used:

Stampers Anonymous/Tim Holtz – Thankful Silhouettes Stamp Set

     Spellbinders – Windy Fall Leaves Press Plates and Die Set

     Spellbinders – Autumn Wishes Stamp and Die Set

     Spellbinders – Precision Layering A2 A Die Set

     Scrapbook.com – Heavy Weight Mixed Media Paper Pad (White)

     Spellbinders – Timber Color Essentials Cardstock

     Copic Alcohol Markers – E33, E37, E29, YG93, YG95, YG97, YG93,

          BG93, BG96, BG99, E13, E15, E39, R37, R39, RV99, E97, E08,

          E19, E40, E41, E42, E43, R22, R05, R08, R37, YG23, YG03,

          YG95, YG97, YR21, Y15, Y13

     Lawn Fawn – Jet Black Premium Ink Pad

     Ranger/Tim Holtz – Distress Archival Ink, Ground Espresso

     Ranger/Tim Holtz – Distress Spray Stain – Crackling Campfire,

          Vintage Photo, Squeezed Lemonade, Bundled Sage

     Ranger/Tim Holtz – Distress Spritz – Crackling Campfire, Squeezed Lemonade

     Stampers Anonymous/Tim Holtz – Grime “THS130” Layering Stencil

     Ranger/Tim Holtz – Distress Opaque Texture Paste

     Ranger/Tim Holtz – Distress Palette Knife

Ranger - Glossy Accents

     Simon Says Stamp – Big Momma Foam Tape

     Ranger Heat It Craft Tool

     Anna Griffin Empress Die Cutting Machine

     Spellbinders BetterPress Letterpress System


Creating the Card Front Background

I cut a piece of white, Heavy Weight Mixed Media Paper from Scrapbook.com to measure 5-1/2” x 6” and used blue painter’s tape to adhere it to a hardboard.  Since I will be using Distress Spray Stain on the panel, I placed the large wordy stamp from Stampers Anonymous/Tim Holtz called “Thankful Silhouettes” onto an acrylic block and stamped the image using Ranger/Distress Ground Espresso Archival Ink. 


Once the stamping was completed, I used the Stampers Anonymous/Tim Holtz “Grime/THS130” stencil and Ranger/Tim Holtz Distress Opaque Texture Paste and partially pasted portions of the background panel in three locations on each background to add interest.  I cleaned up my stencil and palette knife and set the two backgrounds aside to allow the paste to fully dry.


Once the texture paste was dry, I began spritzing Ranger Distress Spray Stains in the colors Crackling Campfire, Bundled Sage, Squeezed Lemonade, and Vintage Photo.  I alternated between these four colors and small amounts of water until I got the look I was trying to achieve.  I dried the panel with my Ranger Heat It Craft Tool and, once relatively dry, I sprayed a bit of Distress Spritz in the Crackling Campfire and Squeezed Lemonade colors to give the background a bit of shimmer.  When everything was completely dry, I removed the inky panel from the hardboard and die cut it using the third largest die from the Spellbinders Precision Layering A2 A die set.  I also die cut a piece of Spellbinders Timber cardstock using the largest die from the Precision Layering A2 A die set for a matting layer.  I adhered the Timber cardstock to the front of a white A2 size card base and added Simon Says Stamp Big Momma Foam Tape to the inky panel and adhered it onto the matting layer.


Creating the Focal Point

For the focal point, I used Spellbinders’ Clear Stamp and Die of the Month from September 2024 called “Autumn Wishes” and I stamped it onto white cardstock using Lawn Fawn Jet Black ink.  I decided to color the image using Copic alcohol markers and these are my color combinations:


     Pumpkins Stems:  E33, E37, E29

     Green Leaves 1:  YG93, YG95, YG97

     Green Leaves 2:  YG93, BG93, BG96, BG99

     Orange/Brown Leaves:  E13, E15, E39, E29

     Pods:  R37, R39, RV99

     Orange Pumpkin:  E97, E08, E19

     Warm Grey Pumpkin:  E40, E41, E42, E43

     Apple:  R22, R05, R08, R37 and YG23, YG03, YG95

     Apple Leaves:  YG97, BG96

     Gingko:  YR21, Y15, Y13


Building the Sentiment

Utilizing the Spellbinders “Autumn Wishes” stamp/die set, I selected the Autumn Wishes sentiment.  I stamped the sentiment onto a piece of white cardstock using Lawn Fawn’s Jet Black ink and die cut it out using the coordinating die that came with the set.  I also die cut a plain white cardstock two more times to stack behind the sentiment for dimension.  I glued all the sentiment layers together and set them aside to dry.


Finishing the Design

To complete the card, I added glue to the back side of my focal point image and adhered it and the sentiment onto the card front background.  There are three little circles that the illustrator drew on the apple in the Copic colored image that I decided to add Ranger Glossy Accents to for a dewy appearance.  Lastly, I added a few Pinkfresh Studio Metallic Matte Gold embellishments and adhered the card front to an A2 size card base.  With that friends… we’ve wrapped up today’s card.


Thank you for stopping by and checking out today’s blog post, I really appreciate it.  Until next time, happy crafting!


Hi friends!  For today’s card I am joining the Spellbinders Lilac Lovelies Contest where participants are asked to create a lilac-colored project using Spellbinders products.  I’ve been wanting to make a card using the cute Spellbinders “Happy Turkey Day” die set ever since I received it and this contest gave me the perfect – not-so-traditional – chance for another fun Thanksgiving card.


The supplies used were:

  Spellbinders Cardstock - Plum, Royal Amethyst, Lilac Blossom, and Purple Mist

  Spellbinders “Happy Turkey Day” Die Set

  Uniball Signo Broad Silver Metallic Pen

  Spellbinders “Make A Wish Arch Labels” Die Set

  Spellbinders “Essential Arches” Die Set

  Spellbinders Treasured Cardstock – Silver Assorted

  Spellbinders / Simon Hurley – “Plaster” 3D Embossing Folder

  Spellbinders “Sentiment Labels” Die Set

  Ranger / Tim Holtz Distress Ink – Villainous Potion

  Spellbinders Mini Blending Brush Set

  Ranger / Tim Holtz Distress “Sterling” Foundry Wax

  Spellbinders “Silver” Glimmer Foil

  Bearly Art Precision Craft Glue in Spellbinders Precision Tip Bottle

  Scrapbook Adhesives Thin 3D Foam Squares

  Nuvo Aqua Shimmer Silver Glitter Gloss

  Ranger Heat It Craft Tool

  Spellbinders Glimmer Hot Foil System


I started the project by cutting all my turkey layers from Spellbinders cardstocks – the colors I used were Plum, Royal Amethyst, Lilac Blossom, and Purple Mist.  I assembled the turkey using liquid glue to adhere the individual pieces, then I used the Copic marker 100 (Black) to color the turkey’s eye and Copic marker RV93 (Smoky Purple) to color the blush oval for his cheek.  I placed a very small piece of redline tape on the back side of the turkey’s head to allow me to adhere the eye and cheek die cuts back into place and thin foam squares to adhere the main turkey body to the tail feathers for extra dimension.  Using a Uniball Signo silver metallic pen, I colored the metal buckle on the turkey’s hat and applied Nuvo Aqua Shimmer to the snood that hangs over the turkey’s beak.


Using the largest die from the Spellbinders “Essential Arches” die set, I cut a panel from the Silver Glitter Metallic cardstock that is part of Spellbinders’ Treasured Silver Assorted cardstock pack and trimmed about 0.25” off the bottom and using the third largest die from this set, I die cut a white cardstock panel to serve as a matting layer from which I also had to trim approximately 0.25” off the bottom.  Then using the Spellbinders “Make a Wish Arch Labels” die set, I used the largest die placed all the way past the edge of the fold of an A2, side folding card panel and cut it to be a shaped card to serve as my card base.  Next, I used a Spellbinders Mini Blending Brush to apply Tim Holtz Distress “Villainous Potion” Ink to the bottom/scalloped edge of my card base.  Once the ink had dried, I used a small paint brush and a little bit of Tim Holtz Distress “Sterling” Foundry Wax and painted it onto the tips of the bottom scalloped edge and heat set it with my Heat It Tool.


I added texture to the white cardstock matting layer by running it through my die cutting machine using the Spellbinders / Simon Hurley “Plaster” 3D embossing folder.  I attached the glitter cardstock layer directly onto the card base using thin foam strips.  Using liquid glue, I attached the white matting layer onto the glitter cardstock layer.


For the sentiment, I used the Spellbinders “Windy Fall Leaves” Betterpress die set and foiled the three sentiments from that die set onto Spellbinders “Royal Amethyst” cardstock using Spellbinders Silver Glimmer Foil.  I die cut the sentiment strip using the Spellbinders “Sentiment Labels” die set, adhered it to the card front using thin foam squares and embellished the ends of the label with two silver/glass AB pearls.


I hope you enjoyed the card and found inspiration for some of your own card making projects!  Until next time… happy making!


Life is full of inspiration and experiences

Follow us on Instagram

  • Instagram
Subscribe to our Mailing List

Thanks for submitting!

  • Instagram

© 2025 by VeeHatt Inspired. Privacy Policy. All Rights Reserved.

bottom of page