Thankful Silhouettes | StampersAnonymous & The Greetery
- Vicky Hattingh
- Nov 9
- 4 min read
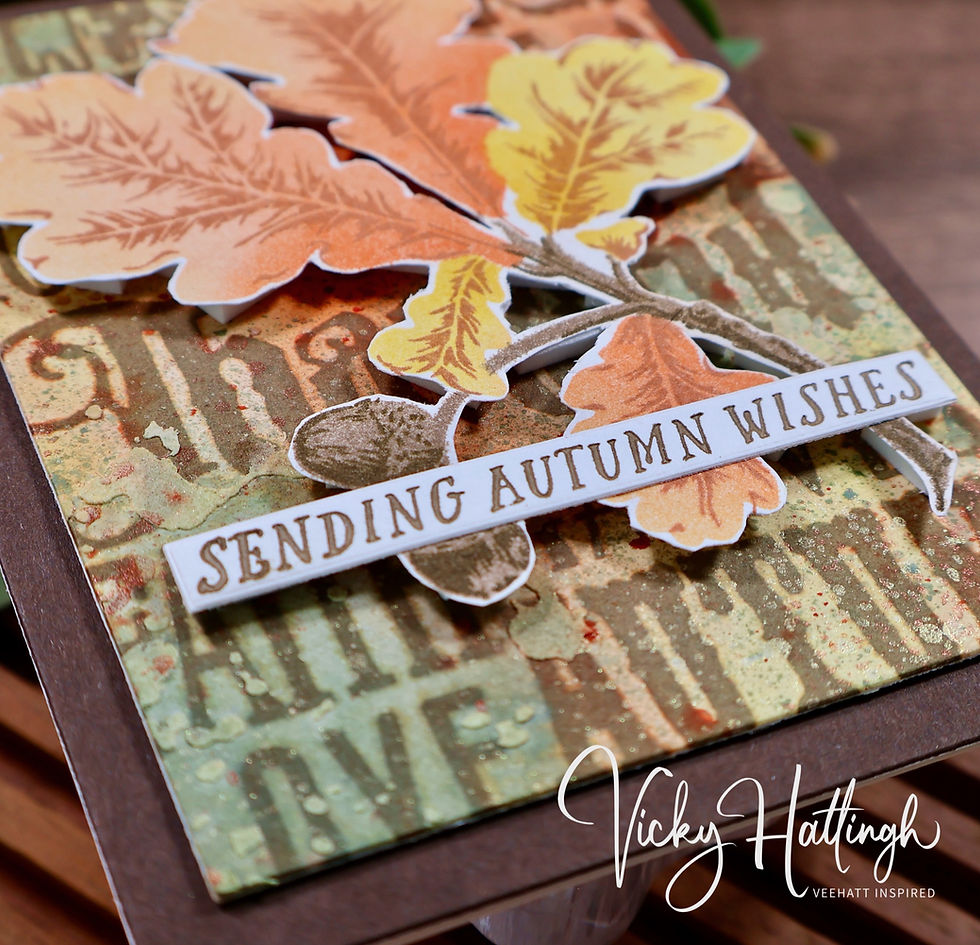
Hi crafty friends! Today I am sharing a colorful Thanksgiving card that I made using the Thankful Silhouettes stamps from Stampers Anonymous and Tim Holtz, as well as a stamp/stencil set from The Greetery. The large wordy stamp in Thankful Silhouettes is everything a crafter needs for a great Thanksgiving background created.

The supplies used:
Stampers Anonymous/Tim Holtz – Thankful Silhouettes Stamp Set
Spellbinders – Windy Fall Leaves Press Plates and Die Set
The Greetery – Oakwood Stamp and Stencil Set
Spellbinders – Precision Layering A2 A Die Set
Scrapbook.com – Heavy Weight Mixed Media Paper Pad (White)
Spellbinders – Timber Color Essentials Cardstock
Ranger/Tim Holtz – Distress Archival Ink, Ground Espresso
Simon Says Stamp Pawsitively Saturated Ink – Clay, Nutmeg,
Cocoa, Cappuccino, Cantaloupe, Sherbet, Honey
Ranger/Tim Holtz – Distress Spray Stain – Crackling Campfire,
Vintage Photo, Squeezed Lemonade, Bundled Sage
Ranger/Tim Holtz – Distress Spritz – Crackling Campfire, Squeezed Lemonade
Stampers Anonymous/Tim Holtz – Grime “THS130” Layering Stencil
Ranger/Tim Holtz – Distress Opaque Texture Paste
Ranger/Tim Holtz – Distress Palette Knife
Simon Says Stamp – Big Momma Foam Tape
Ranger Heat It Craft Tool
Anna Griffin Empress Die Cutting Machine
Spellbinders BetterPress Letterpress System
Creating the Card Front Background
I cut a piece of white, Heavy Weight Mixed Media Paper from Scrapbook.com to measure 5-1/2” x 6” and used blue painter’s tape to adhere it to a hardboard. Since I will be using Distress Spray Stain on the panel, I placed the large wordy stamp from Stampers Anonymous/Tim Holtz called “Thankful Silhouettes” onto an acrylic block and stamped the image using Ranger/Distress Ground Espresso Archival Ink.
Once the stamping was completed, I used the Stampers Anonymous/Tim Holtz “Grime/THS130” stencil and Ranger/Tim Holtz Distress Opaque Texture Paste and partially pasted portions of the background panel in three locations on each background to add interest. I cleaned up my stencil and palette knife and set the two backgrounds aside to allow the paste to fully dry.
Once the texture paste was dry, I began spritzing Ranger Distress Spray Stains in the colors Crackling Campfire, Bundled Sage, Squeezed Lemonade, and Vintage Photo. I alternated between these four colors and small amounts of water until I got the look I was trying to achieve. I dried the panel with my Ranger Heat It Craft Tool and, once relatively dry, I sprayed a bit of Distress Spritz in the Crackling Campfire and Squeezed Lemonade colors to give the background a bit of shimmer. When everything was completely dry, I removed the inky panel from the hardboard and die cut it using the third largest die from the Spellbinders Precision Layering A2 A die set. I also die cut a piece of Spellbinders Timber cardstock using the largest die from the Precision Layering A2 A die set for a matting layer. I adhered the Timber cardstock to the front of a white A2 size card base and added Simon Says Stamp Big Momma Foam Tape to the inky panel and adhered it onto brown the matting layer.

Creating the Focal Point
For the focal point, I used The Greetery’s “Oakwood” stamp and stencil set. I started by taking a piece of 4-1/2” x 5-1/2” white cardstock and placed it on my Simon Says Stamp “Stamp and Stencil Mat” and placed the first stencil from the Oakwood set over the cardstock and ink blended Simon Says Stamp Cappuccino ink over the acorns and a combination of Simon Says Stamp Cantaloupe and Sherbet inks over the two leaves. For stencil 2, I ink blended the top three leaf openings with Simon Says Stamp Honey ink and the same Cantaloupe/Sherbet combination for the bottom leaf opening. For stencil 3, I ink blended the branch openings with the Cappuccino ink.
Next, I placed the ink blended panel into my MISTI stamp positioner and began placing the stamps from the Oakwood stamp set over the ink blended images they coordinated with. These are the Simon Says Stamp ink colors I used for each stamp:
A – Clay
B – Nutmeg (yellow leaves) and Clay (orange leaf)
C & D – Cocoa
I removed the stamped cardstock panel from the MISTI and fussy cut it out since I didn’t have the coordinating die.
Building the Sentiment
Utilizing the Spellbinders “Windy Fall Leaves” Press Plates and Die set, I used Simon Says Stamp Cocoa ink and the ‘Sending Autumn Wishes’ sentiment from that set and together with my Spellbinders BetterPress system created the sentiment and die cut it with the die from that same set. I placed additional scraps of cardstock on the back of the sentiment to give it some additional strength and dimension.

Finishing the Design
To complete the card, I added foam squares to the back side of the leafy focal point and adhered it and the sentiment onto the mixed media, card front background. Lastly, I adhered the card front to an A2 size card base and that wrapped up today’s card.
Thank you for stopping by and checking out today’s blog post, I really appreciate it. Until next time, happy crafting!


Comments