top of page
IMG_3565.JPG

Check Out Our Latest Designs

Subscribe and be the first to know about our latest card making designs!

Hi friends!  Today’s project is a fun Halloween card using the Hero Arts Beep Beep die set and some spooky characters from the Tim Holtz/Idea-ology Halloween Paper Dolls package.  Let’s get started!


The supplies used:

     Hero Arts – Beep Beep Die Set

     Sizzix/Tim Holtz – Moonlight Die Set

     Sizzix/Tim Holtz – Haunted House Die Set

     Waffle Flower – A6 Layers Die Set

     Trinity Stamps – October Night Sky Stencil Set

     Lawn Fawn – Hocus Purr-cus! Stamp Set

     Tim Holtz/Idea-ology – Halloween Paper Dolls

     Altenew – Cosmic Berry Cardstock

     Spellbinders – Royal Amethyst Cardstock

     Spellbinders – Raven Cardstock

     Spellbinders – Fog Cardstock

     Spellbinders – Sage Cardstock

     Impression Obsession – Bats for Halloween 6”x6” Paper Pack

     Altenew – Black Diamond Glitter Cardstock

     Gina K. Designs – Magic Masking Sheets

Ranger – Spun Sugar, Twisted Citron, Picked Raspberry, Dusty Concord Distress Crayons

     Altenew – Grape Agate, Teal Tempest, Jet Black Fresh Dye Inks

     Ranger/Tim Holtz – Bundled Sage, Shabby Shutters, Forest Moss Distress Inks

     Ranger/Tim Holtz – Old Paper Distress Oxide Ink

     Hero Arts – Unicorn Pigment Ink

     Tsukineko - VersaFine Clair Nocturne Pigment Ink

     Altenew – Mini Blending Brushes

     Idea-ology/Tim Holtz – Distress Crayons:  Spun Sugar, Dusty Concord,

          Twisted Citron, Picked Raspberry

     Copic Sketch Alcohol Marker C4, Cool Grey No. 4

     Picket Fence Studios – Liquid Silver Locket Paper Splatter Watercolor

     Ranger Ink – Glossy Accents

     Altenew – 1” Black Double-Sided Adhesive Tape

     Scrapbook Adhesives – Black Thin 3D Foam Squares

     My Sweet Petunia – Original MISTI Stamping Tool

     Anna Griffin Empress Die Cutting Machine


Creating the Background Panel

I started the development of the background panel, by die cutting the smallest moon die outline and the smaller moon full die from the Sizzix/Tim Holtz Moonlight die set from a Gina K. Designs Magic Masking Sheet (for the full moon with detail die – keep the outside the moon scrap piece as well as the actual moon).  I die cut a piece of Spellbinders Sage cardstock using the second largest die from the Waffle Flower A6 Layers die set and die cut Spellbinders Raven cardstock using the largest die in this set.  I used a blending brush and inked the entire Sage panel using Distress Bundled Sage ink to give a darker tone than the Sage was presenting.  Once the ink dried, I added the moon mask that I die cut to the top center of the card so that the moon mask was only about 3/4” onto the card panel.  Next, I ink blended approximately an inch of Shabby Shutters Distress Ink around the edge of the moon.  I ink blended Forest Moss Distress Ink beginning at the edge of Shabby Shutters and continued the ink blending until the ink was blended about three fourths of the way down the cardstock panel.  For the bottom quarter of the ink blending, I used a very heavy layer of Altenew Teal Tempest Fresh Dye Ink since I was trying to come up with something more along the lines of a phthalo green and I didn’t own an ink color in that shade of green, then finished out the ink blending with Altenew Jet Black on the bottom edge.


Now back to the moon… I placed the “outside the moon” Masking Magic moon mask to protect the card’s background to mask off the moon.  I added a layer of Distress Old Paper Oxide Ink to serve as the surface of the moon.  Once the ink dried, I removed the outside the moon mask and added the mask that has the moon with the holes in it and inked the apertures with Distress Bundled Sage Ink.  Using the Trinity Stamps October Night Sky Stencil set, I used the stencil with the wispy clouds and inked them onto the upper portion of the background using Hero Arts Unicorn pigment ink and spattered the background with Picket Fence Liquid Silver Locket Paper Spatter and a small paint brush.  Alas, I could now set the background panel aside to fully dry.


Creating the Focal Point

Using the Hero Arts Beep Beep die set, I die cut the car twice from Spellbinders Purple Amethyst cardstock and glued the two car die cuts together, then partially cut it a third time from a patterned cardstock in the Impression Obsession “Bats for Halloween” paper pack so I could get the windshield negative piece to adhere behind the occupants of the vehicle.  Next, I used an Altenew Mini Blending Brush along with Altenew’s Grape Agate ink to add shading to the car die cut where I felt shading should be.  I die cut the other vehicle dies from these cardstocks:


     Side Mirrors, Metal Rings Around Lights, Front Bumper:  Brushed Silver Cardstock

     Tires:  Spellbinders Raven Cardstock

     Steering Wheel, License Plate:  Spellbinders Fog Cardstock

     Lights:  Spellbinders Sage Cardstock


Once the die cutting was completed, I glued all the car die cuts (except the license plate and negative, windshield piece) to their appropriate location onto the ink blended car die cut. 


After digging through the many options in the package of Tim Holtz/Idea-ology Halloween Paper Dolls package, I selected two of the paper dolls that made me giggle the most, positioned them behind the front window of the car, trimmed any excess that exceeded the edge of the car, and gave them a bit of color using Tim Holtz Distress Crayons before gluing them into place.  If you would like to use the same colors, I used:


     Cheeks:  Spun Sugar

     Dress:  Twisted Citron

     Suit Coat:  Picked Raspberry

     Suit Vest:  Dusty Concord


Of course, you don’t need to add color to the paper dolls, but I thought it added to the creepiness.  Once the people were glued behind the open windshield, I added the patterned paper windshield die cut and glued it in place behind the paper doll characters.  Next, I used a C4 Copic marker to add some dots to the steering wheel to give it some more interest and added Ranger’s Glossy Accents to the headlights and turn indicator lights then set the car aside to allow the Glossy Accents to dry.


Creating the Sentiment

For the sentiment, I placed the license plate die cut that was created using Fog cardstock during the Creating the Focal Point into my MISTI stamp positioner and used the HALLOWEEN sentiment from Lawn Fawn’s Hocus Purr-cus! stamp set along with VersaFine Clair Nocturne ink to stamp the word onto the center of the license plate die cut.  Once the ink dried, I went around the edges of the Fog-colored license place with a black marker so it would stand out better against the brushed silver car bumper.


Assembling the Card

I added Altenew’s black Instant Dimension Foam Tape to the back side of the car of characters and adhered it to the lower front of the card’s background.  For the bats, I used the Sizzix/Tim Holtz Haunted House die set and Altenew’s Black Diamond Glitter Cardstock and die cut the little bat dies and used liquid glue to adhere them to the night sky.  I adhered the license plate onto the car’s bumper using black Instant Dimension Foam Tape.


Thank you for stopping by and checking out today’s blog post, I really appreciate it.  Until next time, happy crafting!


Hi crafty friends!  I’m back to share my final creation for this year’s Craftoween box kit with you.  Today’s card is Day 13’s die envelope and I’m going to reach out of my comfort zone and make my very first  pop-up card!


The supplies used were:

Spellbinders – 13 Days of Craftoween Box Kit, Day 13 Dies

    Lawn Fawn – Platform Pop-Up Die Set

    Spellbinders – Halloween Wonder Die Set

    Spellbinders – Halloween Wreath Add-Ons

    Sizzix/Tim Holtz – Moonlight Die Set

    Pretty Pink Posh – Spooky Fence

    Spellbinders – Royal Amethyst Essentials Cardstock

    Ranger/Tim Holtz – Distress Black Two-Tone Woodgrain Cardstock

    Spellbinders – Beeswax Colorwheel Cardstock

    Spellbinders – Alabaster Colorwheel Cardstock

    Spellbinders – Onyx Mirror Metallic Treasured Cardstock

    Spellbinders – Peridot Colorwheel Cardstock

    Spellbinders – Lilac Colorwheel Cardstock

    Spellbinders – Lunar Grey Essentials Cardstock

    Spellbinders – Graphite Essentials Cardstock

    Gina K. Designs – Onyx Black Cardstock

    Simon Says Stamp – Clear Acetate Sheets

    Ranger/Tim Holtz – Tea Dye Distress Ink Pad

    Ranger/Tim Holtz – Antique Linen Distress Ink Pad

    Brutus Monroe Alabaster White Embossing Powder

    Simon Says Stamp Clear Watermark and Embossing Ink

    WOW!  Heat Embossing Tool

    Bearly Art Precision Craft Glue

    Misti Original Stamp Positioning Tool

    Anna Griffin Empress Die Cutting Machine


I started today’s card by die cutting and assembling the pop-up platform from the Lawn Fawn “Platform Pop-Up” die set.  If you want to do the same type card you might want to do what I did and look for the instructions on YouTube… it’s a bit confusing at first, but overall easy to assemble.  The pop-up platform was die cut from Spellbinders Royal Amethyst Essentials cardstock with Ranger’s Distress Black Two-Tone Woodgrain cardstock for the decorative squares that go around the outside of the platform.  The little tabs that will hold up your decorations were die cut from Simon Says Stamp Clear Acetate.  I also die cut two of the grass strips from the die in the set using Gina K. Designs Onyx Black cardstock.


I created a moon for my background layer of the pop-up using the Sizzix/Tim Holtz “Moonlight” die set.  The base of the moon was die cut from Spellbinders Alabaster cardstock ink blended with Distress Antique Linen ink and the front layer of the moon was die cut using Spellbinders Beeswax cardstock that was ink blended using Distress Tea Dye ink.  The two moon layers were glued together and set aside to dry.


For some of the decorative die cuts, I used the Spellbinders “Halloween Wonder” for the tombstone which was die cut from Spellbinders Lunar Grey and Graphite Essentials cardstock.  The picket fence was die cut from Pretty Pink Posh’s “Spooky Fence” die set out of Spellbinders Onyx Mirror Metallic Treasured Cardstock.  Then from Spellbinders’ “Halloween Wreath Add-Ons” die set, I die cut three bats from Gina K. Design’s Onyx Black cardstock.


Now for the Day 13 die set – I die cut each of the elements from the following cardstock and glued them together after die cutting was completed:

    Coffin Front Panel:  Ranger/Tim Holtz Distress Black Two-Tone Woodgrain Cardstock

    Hand:  Spellbinders Peridot Colorwheel Cardstock

    Skull and Bone:  Spellbinders Snowdrift Cardstock

    Coffin Back Panel:  Reverse Side of Distress Black Two-Tone Woodgrain Cardstock

    Coffin Lining:  Spellbinders Lilac Colorwheel Cardstock 


I glued the picket fence to the first tab of the pop-up platform and glued one of the black grass strips to the front of the fence.  Once the glue on those dried, I added the tombstone and bone to the right side of it.  On the second platform tab, I glued the cute coffin die cut onto a strip of acetate and then adhered the acetate to the actual platform tab.  Lastly on the third tab of the platform, I adhere the moon die cut to a strip of acetate to elevate it in the scene and adhered the acetate strip to the pop-up platform’s tab and glued the three bats directly to the moon front.


For the sentiment, I used one of the sentiment stamps from the Craftoween box set.  I stamped the sentiment onto Onyx Black cardstock and applied Brutus Monroe Alabaster White embossing powder, tapped off the excess and heat set the sentiment.  I fussy cut the sentiment and glued it to the front panel of the platform base. This card fits perfectly in a 5x7 envelope!


That completes today’s card!  Thanks so much for stopping by, I hope you enjoyed this final, Day 13 pop-up card showcasing the dies from the Spellbinders 13 Days of Craftoween boxed kit and found inspiration for some of your own card making projects!  Craftoween was such a treat this year – Spellbinders really knocked it out of the park with the imaginative, fun die sets.  I’m only sad there were just 13 days versus 31!


Until next time… happy making!


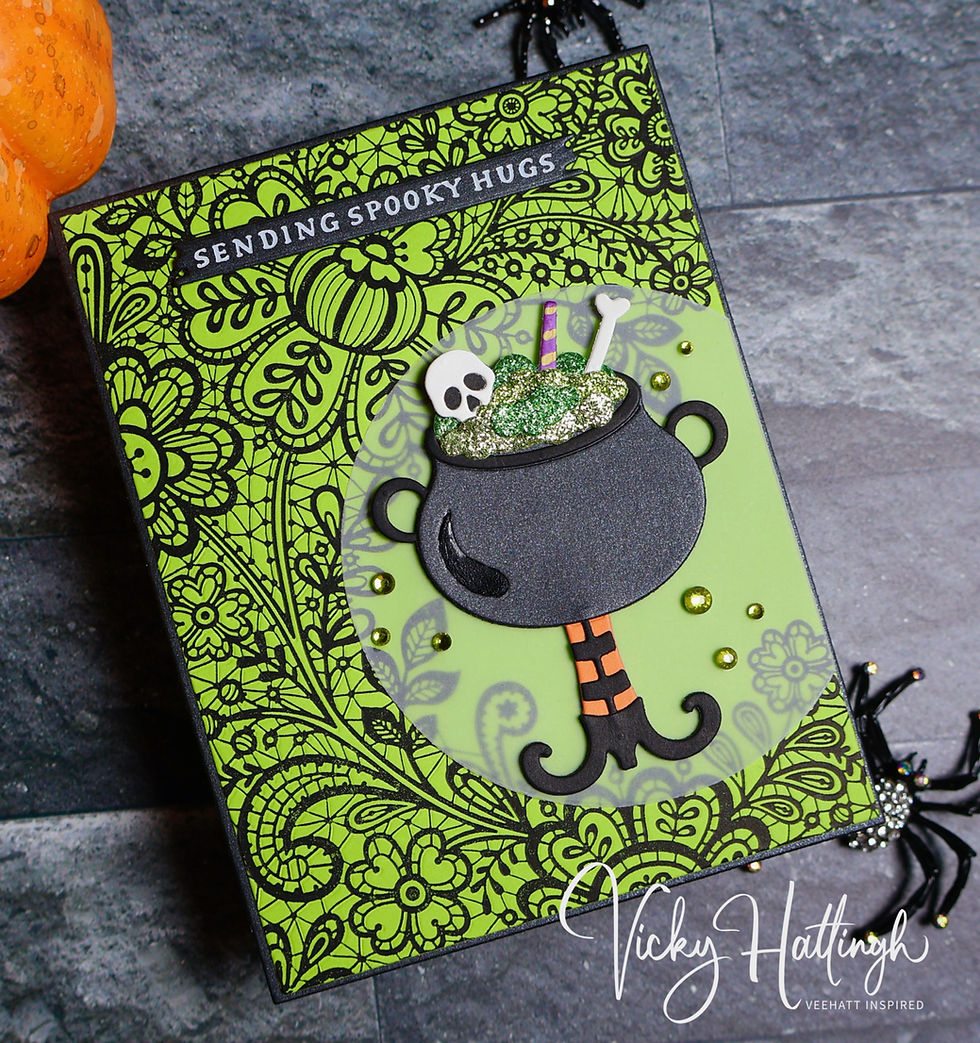
Hi crafty friends!  I’m back to share my creation for Day 12 from the 2025 Spellbinders 13 Days of Craftoween kit. 


The supplies used were:

Spellbinders – 13 Days of Craftoween Box Kit, Day 12 Dies

    Spellbinders – Friendship Lace BetterPress Plates

    Spellbinders – Precision Layering A2 B Die Set

    Spellbinders – Precision Layering A2 A Die Set

    Hero Arts – Nested Circle Infinity Dies

    Spellbinders - Antique Matte Metallic Treasured Cardstock

    Spellbinders – Brushed Black Cardstock

    Spellbinders – Carrot Essentials Cardstock

    Gina K. Designs – Onyx Black Cardstock

    My Favorite Things – Limelight Cardstock

    Altenew – Forest Canopy Glitter Cardstock Set

    Thin Vellum from Amazon

Spellbinders Glimmer Hot Foiling System

Spellbinders - Opaque Black Glimmer Foil

    Sakura Moonlight Gelly Roll Pen #405P

    Sakura Black Glaze Pen #849

    Simon Says Stamp Black Foam Squares

    Bearly Art Precision Craft Glue

    Misti Original Stamp Positioning Tool

    Anna Griffin Empress Die Cutting Machine


I began today’s card by doing some hot foiling.  I used the Spellbinders Opaque Black Glimmer Foil and the Spellbinders “Friendship Lace BetterPress Plates” to hot foil the large press plate from this set onto a piece of My Favorite Things Limelight cardstock.  Then I used the largest die from both the Spellbinders “Precision Layering A2 A” and “Precision Layering A2 B” die sets to cut out my hot foiled panel and well as the Brushed Black matting layer for my card front.


Now for the Day 11 die set – I die cut each of the elements from the following cardstock and glued them together after die cutting was completed:


    Cauldron Base:  Spellbinders Brushed Black Cardstock

         (Sakura Black Glaze added to highlight area on cauldron)

    Cauldron Rim and Handles:  Gina K. Designs Onyx Black Cardstock

    Skull and Bone:  Spellbinders Antique Matte Metallic Treasured Cardstock

    Witches Boots, Sock Stripes, and Skull Base:  Gina K. Designs Onyx Black Cardstock

    Cauldron Bubbles:  Altenew Peridot, Jadeite, & Titanite Glitter Cardstocks

    Witch Socks:  Spellbinders Carrot Cardstock

    Straw:  Scrap purple from my stash (stripes added using Moonlight Gelly Roll #405P)


The cauldron base, witch’s boots, and socks were each cut three additional times from regular black cardstock to add dimension to the focal point that will be adhered to a circle of vellum in my next step.  I glued two of the additional die cuts to the back side of the cauldron and set the other extra die cuts aside for now.


Using the fourth largest circle from the Hero Arts “Nested Circle Infinity Dies”, I die cut a piece of thin vellum that I purchased years ago from Amazon.  This vellum circle will be a landing point for the cauldron on the card front.  I positioned the vellum circle over the opening in the background that was foiled onto the Limelight cardstock and once the correct position was found, I glued the cauldron to the front and trimmed the excess vellum off the right side of the card front. I also glued those last three black diecuts (cauldron base, socks and witch boots) to the reverse side of the vellum and lined them up with their coordinating piece from the front side of the vellum - this is being done to make it easier to hide the glue on the vellum.   Next, I glued the cauldron/vellum focal point to the card front and then glued the card front to the Brushed Black card front matting panel.


For the sentiment, I used one that I had created in an earlier cardmaking session from the Spellbinders “Halloween Icons” press plate set.  I added a few strips of scrap black cardstock to the back side to give it dimension and adhered it to the card front.  To finish the card, I added few green gems that I’ve had in my stash for about a decade (and glad I’ve kept them all these years!).


That completes today’s card!  Thanks so much for stopping by, I hope you enjoyed this Day 12 card showcasing the dies from the Spellbinders 13 Days of Craftoween boxed kit and found inspiration for some of your own card making projects!  One more day to go!!


Until next time… happy making!


Life is full of inspiration and experiences

Follow us on Instagram

  • Instagram
Subscribe to our Mailing List

Thanks for submitting!

  • Instagram

© 2025 by VeeHatt Inspired. Privacy Policy. All Rights Reserved.

bottom of page