

- Vicky Hattingh
- Aug 30, 2025
- 3 min read
Hi crafty friends! I’m back to share my creation for Day 12 from the 2025 Spellbinders 13 Days of Craftoween kit.
The supplies used were:
Spellbinders – 13 Days of Craftoween Box Kit, Day 12 Dies
Spellbinders – Friendship Lace BetterPress Plates
Spellbinders – Precision Layering A2 B Die Set
Spellbinders – Precision Layering A2 A Die Set
Hero Arts – Nested Circle Infinity Dies
Spellbinders - Antique Matte Metallic Treasured Cardstock
Spellbinders – Brushed Black Cardstock
Spellbinders – Carrot Essentials Cardstock
Gina K. Designs – Onyx Black Cardstock
My Favorite Things – Limelight Cardstock
Altenew – Forest Canopy Glitter Cardstock Set
Thin Vellum from Amazon
Spellbinders Glimmer Hot Foiling System
Spellbinders - Opaque Black Glimmer Foil
Sakura Moonlight Gelly Roll Pen #405P
Sakura Black Glaze Pen #849
Simon Says Stamp Black Foam Squares
Bearly Art Precision Craft Glue
Misti Original Stamp Positioning Tool
Anna Griffin Empress Die Cutting Machine
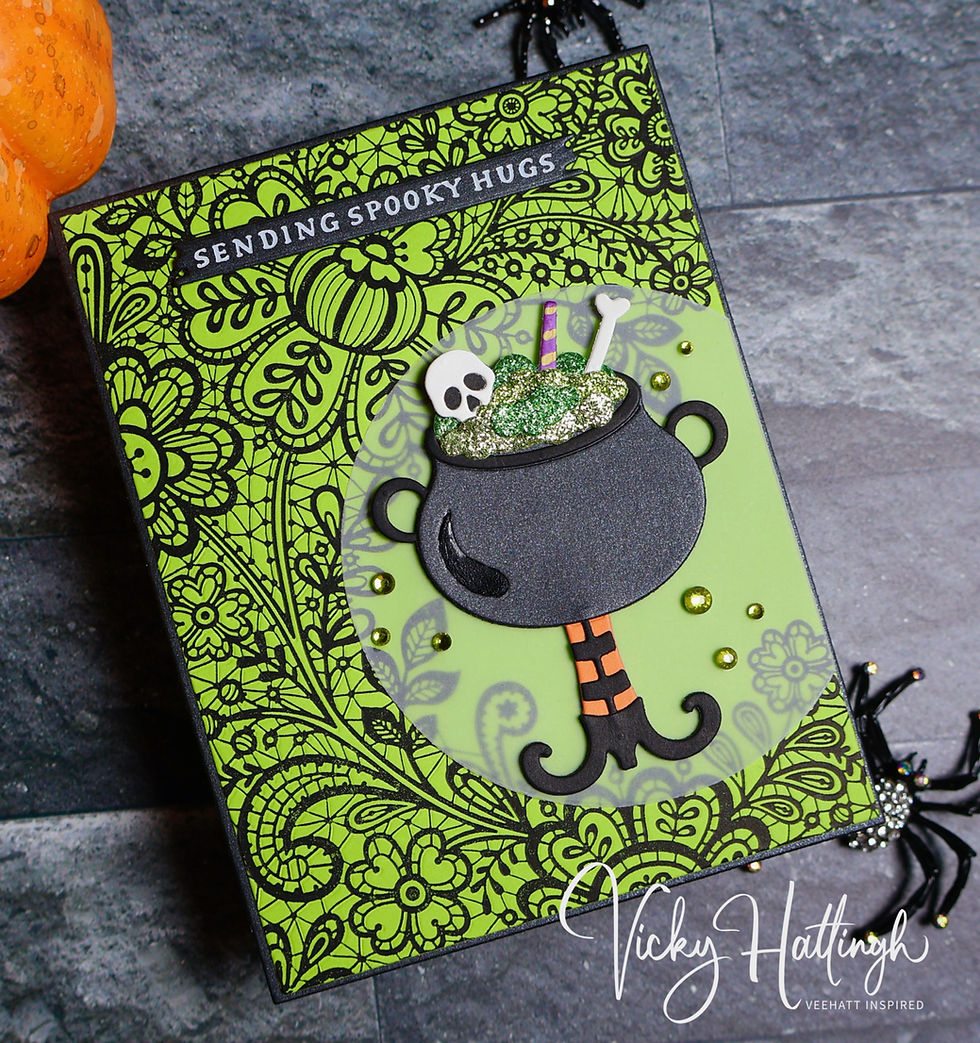
I began today’s card by doing some hot foiling. I used the Spellbinders Opaque Black Glimmer Foil and the Spellbinders “Friendship Lace BetterPress Plates” to hot foil the large press plate from this set onto a piece of My Favorite Things Limelight cardstock. Then I used the largest die from both the Spellbinders “Precision Layering A2 A” and “Precision Layering A2 B” die sets to cut out my hot foiled panel and well as the Brushed Black matting layer for my card front.
Now for the Day 11 die set – I die cut each of the elements from the following cardstock and glued them together after die cutting was completed:
Cauldron Base: Spellbinders Brushed Black Cardstock
(Sakura Black Glaze added to highlight area on cauldron)
Cauldron Rim and Handles: Gina K. Designs Onyx Black Cardstock
Skull and Bone: Spellbinders Antique Matte Metallic Treasured Cardstock
Witches Boots, Sock Stripes, and Skull Base: Gina K. Designs Onyx Black Cardstock
Cauldron Bubbles: Altenew Peridot, Jadeite, & Titanite Glitter Cardstocks
Witch Socks: Spellbinders Carrot Cardstock
Straw: Scrap purple from my stash (stripes added using Moonlight Gelly Roll #405P)
The cauldron base, witch’s boots, and socks were each cut three additional times from regular black cardstock to add dimension to the focal point that will be adhered to a circle of vellum in my next step. I glued two of the additional die cuts to the back side of the cauldron and set the other extra die cuts aside for now.

Using the fourth largest circle from the Hero Arts “Nested Circle Infinity Dies”, I die cut a piece of thin vellum that I purchased years ago from Amazon. This vellum circle will be a landing point for the cauldron on the card front. I positioned the vellum circle over the opening in the background that was foiled onto the Limelight cardstock and once the correct position was found, I glued the cauldron to the front and trimmed the excess vellum off the right side of the card front. I also glued those last three black diecuts (cauldron base, socks and witch boots) to the reverse side of the vellum and lined them up with their coordinating piece from the front side of the vellum - this is being done to make it easier to hide the glue on the vellum. Next, I glued the cauldron/vellum focal point to the card front and then glued the card front to the Brushed Black card front matting panel.
For the sentiment, I used one that I had created in an earlier cardmaking session from the Spellbinders “Halloween Icons” press plate set. I added a few strips of scrap black cardstock to the back side to give it dimension and adhered it to the card front. To finish the card, I added few green gems that I’ve had in my stash for about a decade (and glad I’ve kept them all these years!).

That completes today’s card! Thanks so much for stopping by, I hope you enjoyed this Day 12 card showcasing the dies from the Spellbinders 13 Days of Craftoween boxed kit and found inspiration for some of your own card making projects! One more day to go!!
Until next time… happy making!


