- Vicky Hattingh
- Jul 10
- 5 min read
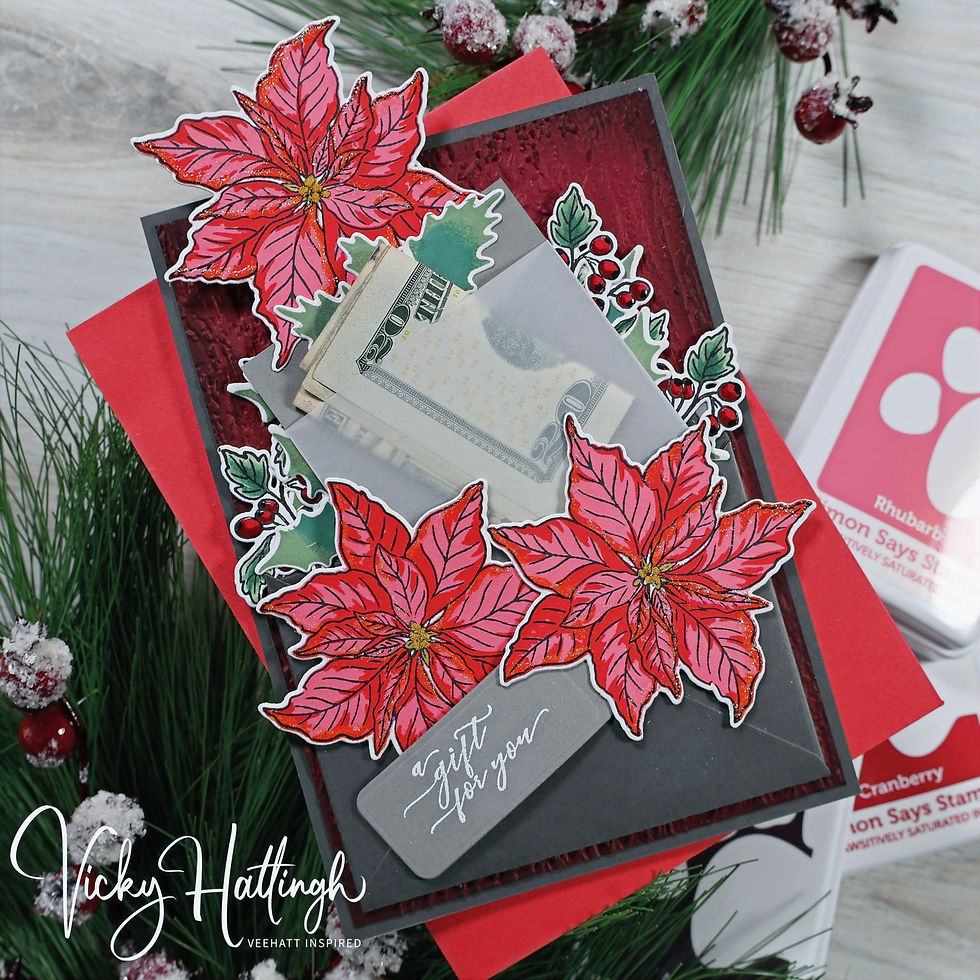
Hi friends! Today’s card will be the fifth installment in my 2026 Holiday Card Series where I am attempting to have my holiday cards mostly completed before mid-November. I’ve created this installment with die and/or stamp sets from Altenew and Spellbinders to create a unique Christmas card that also serves as a gift card holder – a gift and Christmas card in one!

The supplies used:
Altenew – Poinsettia & Berries Stamp and Die Set
Spellbinders – Envelope of Wonder Die Set
Lawn Fawn – Jet Black Ink Pad
Simon Says Stamp – Rhubarb Pawsitively Saturated Ink Pad
Simon Says Stamp – Cranberry Pawsitively Saturated Ink Pad
Simon Says Stamp – Aster Pawsitively Saturated Ink Pad
Copic Sketch Alcohol Marker YG95, E79, E74, R89, R37, G29, G46, G21
Tsukineko – VersaMark Watermark Ink Pad
Brutus Monroe – Alabaster White Heat Embossing Powder
Woodland Scenics – Paper Flower Pollen – Yellow (Spellbinders)
Spellbinders – Merlot, Graphite, and Lunar Grey Cardstock
Ranger Ink – Glossy Accents
Bearly Art Precision Craft Glue
Scor-Tape – ¼” Double-Sided Adhesive Tape
Scrapbook Adhesives – Thin 3D Foam Squares
Tonic Studios – White Blizzard Nuvo Glitter Drops
Altenew – Stampwheel 2.0 Stamping System
Anna Griffin Empress Die Cutting Machine
Creating the Envelope
For the envelope, I used the Spellbinders Envelope of Wonder die set and die cut the envelope’s pieces from Spellbinders Graphite and Lunar Grey cardstocks. I glued the flaps and the trim die cut to the envelope base.

Creating the Floral Elements
For the poinsettias, I used Altenew’s “Poinsettia & Berries” stamp and die set – in case anyone wanted to use this stamp/die set, I’m not sure if it’s available anymore because I bought this one in 2020 (sorry!). I die cut six poinsettia outlines with the coordinating poinsettia die in the set– I wanted to die cut before stamping to make sure I was able to get the florals centered as best I could and there will be three total ink blended poinsettias for the card and die cut six so I could double-up each die cut. I placed the poinsettia die cut in my Stampwheel 2.0 and positioned the A1 stamp in the stamp set over the white die cut and inked it with Lawn Fawn Jet Black Ink, I repeated this step two additional times. For stamp A2, I chose to use Simon Says Stamp’s Rhubarb ink and stamped each of the die cuts with that stamp layer consecutively then used Simon Says Stamp’s Cranberry ink for stamp A3 in the same fashion. Instead of stamping the poinsettia centers, I chose to color them with Copic alcohol marker YG95 as a base coat and then added a few dots of Bearly Arts Precision Craft Glue to the centers of each flower and layered a coating of Woodland Scenics Yellow Paper Flower Pollen over the glue and set them aside to dry.

Since I wanted to add a secret money/gift card element to this card, I trimmed a piece of the Lunar Grey cardstock to measure 3” x 3” and used liquid glue to adhere the bottom of one of the poinsettia flowers to this small cardstock panel. Next, I glued the second set of plain white poinsettia die cuts to the back side of the each of the three ink blended poinsettias (for the one attached to the Lunar Grey cardstock, I sandwiched the grey cardstock between the two poinsettia die cuts. For the money pocket, I cut a piece of vellum that measures 4” x 2.75” and I scored the vellum with my Scor-Buddy along three of the edges at ½”. Before reinforcing the folds, I used scissors to cut out the two squares created by the scoring along the bottom edge which will allow the folds to be sharper and the pocket less bulky on the back side. I applied ¼” wide Scor-Tape along the three half inch edges that I previously scored, removed the adhesive backing, positioned the vellum over the bottom edge of the grey cardstock with the poinsettia attached at the top, then folded over the three adhesive edges to wrap around to the back of the grey cardstock element.
To finish up my floral element portion of the card, I stamped the holly five times for each design (may not use them all) from the same stamp set using Simon Says Stamps’ Kale and Artichoke ink pads. I inked up the stamps first with the Artichoke ink, stamped them, then added the Kale ink around the bottom edges, smoothed out the hard line with a blending brush, then stamped the Kale inked stamps onto the same location on the cardstock. For the berries on stamp B2, I used the Simon Says Stamp Cranberry Ink pad and for stamp B3 I used Ranger/Tim Holtz’s Archival Brown Espresso ink. Once the stamping was completed, I added Ranger’s Glossy Accents to the berries on the holly twigs.
I decided to color the branches with the berries on them using Copic Sketch alcohol markers. The color combinations I used were:
Branch: E79, E74
Berries: R89, R37
Leaves: G29, G46, G21
Once the branches with the berries were colored, I added Glossy Accents to the berries.
Creating the Sentiment
For the sentiment, I die cut a tag using Lunar Grey cardstock and one of the tag dies from the Spellbinders Assorted Tags die set. The sentiment I chose to heat emboss onto the tag is from Altenew’s Holiday Tag Sentiments stamp set and I used Brutus Monroe’s Alabaster White heat embossing powder and Versamark ink to complete the sentiment stamping.

Assembling the Card
To assemble the card, I added a combination of thin foam adhesive squares and liquid glue to begin adhering the floral elements behind the money holder element in the envelope. I kept all the holly and berry twigs glued flat behind the money holder element so that it wouldn’t snag it when pulled in and out of the envelope. I did, however, pop the poinsettias on the outside of the envelope up on the foam squares since their dimension wouldn’t hinder anything inoperable.
I cut a piece of the Graphite cardstock to measure 5” x 7” for the matting layer of the card, then cut a piece of Spellbinders’ Merlot cardstock to measure 4.75” x 6.75” for the background. I added texture to the Merlot cardstock panel by using the Spellbinders Bark 3D Embossing Folder and then darkened the outer edges of the embossed cardstock panel by applying Simon Says Stamp Aster ink to the edges using a foam blending tool. I adhered the Merlot cardstock to the matting layer using liquid glue and adhered those two layers to the front of a white 5” x 7”, side-folding, card base. Next, I attached the envelope to the card front using liquid glue and a few small, thin 3D foam squares under a few of the pieces of foliage that extended beyond the envelope onto the card front and the very last step was adding the tag/sentiment to the front of the envelope using foam squares.
Thank you for stopping by and checking out today’s blog post, I really appreciate it. Until next time, happy crafting!